Orchestrating Docker containers and Aerospike Clusters
Background
In this example, we show the following:
- building a multi-container application with a Web Application and an Aerospike Database
- running and testing
- injecting behavior for the production environment
- adding a load balancer to scale the Web App
- growing the Aerospike cluster
Its a Counter!
Who does not love a Web Page Counter - but lets make it scalable! Here's what we want to track:
- a record for each Page hit
- a summary of the total amount of hits
- a summary for each hit received by each App Server
We will also want to have this data persistent and deployed in a set (Shipload?) of Containers.
Application Code
This example uses Python and Flask to create a very simple Web Application. This is not intended as an example of Production code.
from flask import Flask, request
import aerospike
import os
import datetime
import time
import socket
import uuid
app = Flask(__name__)
config = {
'hosts': [ (os.environ.get('AEROSPIKE_HOST', 'prod_aerospike_1'), 3000) ],
'policies': { 'key': aerospike.POLICY_KEY_SEND }
}
host = socket.gethostbyname(socket.gethostname())
@app.route('/')
def hello():
try:
if aerospike.client(config).is_connected()==False:
client = aerospike.client(config).connect()
id = str(uuid.uuid1());
# Insert the 'hit' record
ts = int(round(time.time() * 1000))
client.put(("test", "hits", id), {"server": host, "ts": ts} )
# Maintain our summaries for the grand total and for each server
client.increment(("test", "summary", "total_hits"), "total", 1)
client.increment(("test", "summary", host), "total", 1)
(key, meta, bins) = client.get(("test","summary","total_hits"))
# Return the updated web page
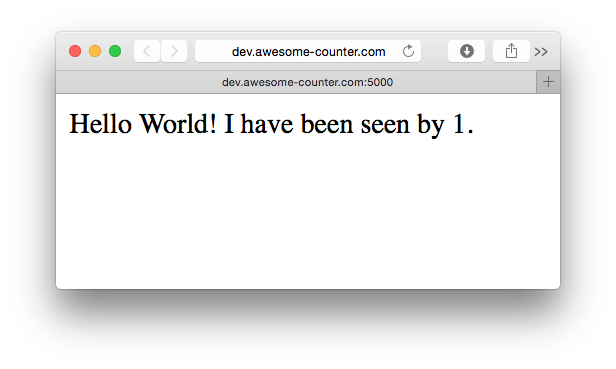
return "Hello World! I have been seen by %s." % bins["total"]
except Exception as e:
return "Hummm - %s looks like we have an issue, let me try again" % "err: {0}".format(e)
if __name__ == "__main__":
app.run(host="0.0.0.0", debug=True)
Deploying into a Development Environment
Lets keep things simple and deploy our containers to a single Docker Daemon. This keeps the dev & test cycle simple and we can run it locally on our laptop.
For this example, let's create a new docker daemon dev.
$ docker-machine create \
  -d virtualbox \
  dev
Dockerfile for the application
We use Docker to wrap up the dependencies for our Flask application and build an image with our application code baked in.
$ cat Dockerfile
FROM python:2.7
ADD . /code
WORKDIR /code
RUN apt-get update
RUN apt-get -y install python-dev
RUN apt-get -y install libssl-dev
RUN pip install --no-cache-dir flask requests aerospike
EXPOSE 5000
CMD python app.py
Docker compose file
Next we need to Orchestrate the various containers we need to deploy the Application for testing. We use a Docker Compose file to
- describe the two services (Aerospike Database and a Web Application)
- provide the steps required to build the code
- inject any specific configuration
$ cat docker-compose.yml
version: '3.7'
services:
    web:
        build: .
        ports:
          - "5000:5000"
        links:
          - aerospike
        hostname: dev.awesome-counter.com
        environment:
          - AEROSPIKE_HOST=aerospike
    aerospike:
        image: aerospike/aerospike-server
        volumes:
          - $PWD:/opt/aerospike/etc
Launch the Orchestration
We can now launch the Orchestration and test the application.
$ docker-compose up -d
Creating dev_aerospike_1
Creating dev_web_1
Connect to the application
The Docker Daemon will expose an IP address that we can direct our browser to to view the application.
$ echo "$(docker-machine ip dev) dev.awesome-counter.com" | sudo tee -a /etc/hosts
$ open http://dev.awesome-counter.com:5000
In your browser you should see something like this
Testing complete, push the Image
Now that we have finished testing, we can push the Docker Image to Docker Hub so that we can use the image in our production deployment. You will need to create an account at Docker Hub or use your own private Docker repository.
$ docker build -t myrepo/web-app-as .
Step 1 : FROM python:2.7
 ---> 7436fc1e0756
...
Successfully built 7d1460017d70

$ docker push myrepo/web-app-as
Deploying into production
Typically there are additional requirements and operational needs that need to be reflected in a Production deployment. For example
- Add in a Load Balancer to scale the Web tier
- Inject production constraints
- Ensure the correct network segmentation between the tiers
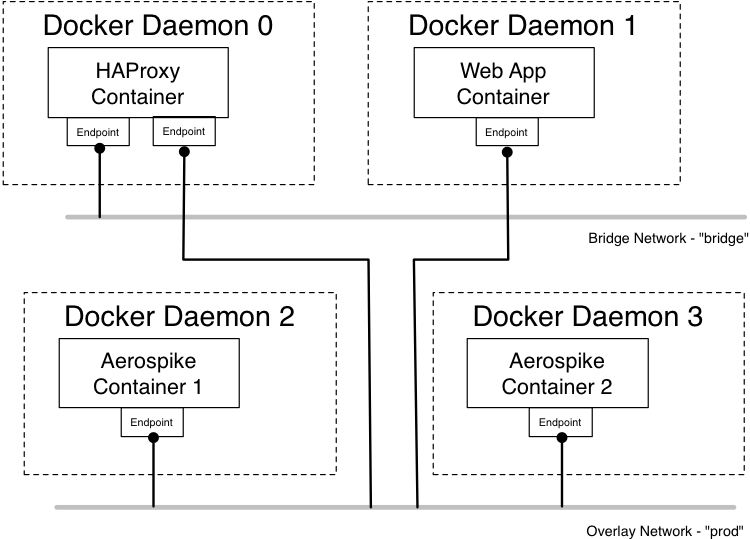
We want to end-up with a deployment topology that looks like:
Create a Docker Swarm cluster
Creating the Docker Swarm Cluster is discussed in the Orchestration and Networking chapters.
For this example, let's create three docker daemons - swarm-0, swarm-1 and swarm-2 with swarm-0 as leader.
$ docker-machine create -d virtualbox swarm-0
$ docker-machine create -d virtualbox swarm-1
$ docker-machine create -d virtualbox swarm-2
ssh into swarm-0 host,
$ docker-machine ssh swarm-0
Initialize a swarm,
$ docker@swarm-0:~$ docker swarm init --advertise-addr 192.168.99.100

Swarm initialized: current node (pxm3camwziche2m3izagzu4hh) is now a manager.

To add a worker to this swarm, run the following command:

    docker swarm join --token SWMTKN-1-25n0u8nshb1dv17t4f5ohzv3o58dpkq8lccnx2asg7ryc5ympu-aeyve5o5fadzpb5mw9dlza44p 192.168.99.100:2377

To add a manager to this swarm, run 'docker swarm join-token manager' and follow the instructions.
Join swarm-1 and swarm-2 worker nodes,
$ eval $(docker-machine env swarm-1)
$ docker swarm join --token SWMTKN-1-25n0u8nshb1dv17t4f5ohzv3o58dpkq8lccnx2asg7ryc5ympu-aeyve5o5fadzpb5mw9dlza44p 192.168.99.100:2377

This node joined a swarm as a worker.
$ eval $(docker-machine env swarm-2)
$ docker swarm join --token SWMTKN-1-25n0u8nshb1dv17t4f5ohzv3o58dpkq8lccnx2asg7ryc5ympu-aeyve5o5fadzpb5mw9dlza44p 192.168.99.100:2377

This node joined a swarm as a worker.
$ docker node ls
ID                            HOSTNAME            STATUS              AVAILABILITY        MANAGER STATUS      ENGINE VERSION
pxm3camwziche2m3izagzu4hh *   swarm-0             Ready               Active              Leader              19.03.2
b1dbfxf02g6cnrhhzefx7zb8m     swarm-1             Ready               Active                                  19.03.2
p41tarqwk7yks5d6qwz0san6l     swarm-2             Ready               Active                                  19.03.2
Create Docker Compose file
We will now define the three services that make up the production version of our application:
- HAProxy for load balancing
- Aerospike for the Database
- Web application
Define Load Balancer (HAProxy) Service
We will use HAProxy to act as a load balancer for the App Servers. As we spin up additional Containers running the Web App, we need to reconfigure HAProxy. This is easily done manually, but we want to automatically register a new endpoint when a Web App Containers starts and de-register when the Container stops. For this we will use the open source docker image dockercloud/haproxy.
proxy:
    image: dockercloud/haproxy
    depends_on:
      - web_app
    environment:
      - BALANCE=leastconn
    volumes:
      - /var/run/docker.sock:/var/run/docker.sock
    ports:
      - 80:80
      - 1936:1936
    networks:
      - prod
    deploy:
        placement:
          constraints: [node.role == manager]
- The
proxy(haproxy load balancer) will wait forweb_appservice to be ready or finished. - Load balancing algorithm is set to
leastconnusingBALANCEenv variable. - Ports 80 (load balancer port) and 1936 (haproxy stats) are exposed.
- Set network to
prod(which will soon be created below). - Using constraint to make sure we are running the
proxyservice onswarm manager.
Define Web App Service
web_app:
    image: myrepo/web-app-as
    ports:
      - 5000
    depends_on:
      - aerospike
    hostname: prod.awesome-counter.com
    environment:
      - SERVICE_PORTS=5000
      - AEROSPIKE_HOST=aerospike
    networks:
      - prod
- The image we want to use (from the previous section
devdeployment). - The
web_appservice is set to wait foraerospikeservice. - hostname is set to
prod.awesome-counter.com. AEROSPIKE_HOSTspecifies seed node for the client. Here we are passing inaerospikeservice name which will automatically resolve to container IPs.- Set network to
prod(which will soon be created below).
Define Aerospike Service
aerospike:
    image: aerospike/aerospike-server
    volumes:
      - $PWD:/etc/aerospike
    networks:
      - prod
- Uses
aerospike/aerospike-servercommunity edition docker image. - Maps the current directory to the volume
/etc/aerospikeso that theaerospike.confcan be overridden- The
aerospike.conffile for this example can be found here
- The
- Set network to
prod(which will soon be created below).
The complete file (combining all three services) can be found here
Define prod network
networks:
  prod:
    driver: overlay
    attachable: true
Deployment
Use Stack/Compose to deploy the services/containers.
$ docker stack deploy -c example.yml example

Creating network example_prod
Creating service example_proxy
Creating service example_web_app
Creating service example_aerospike
Test the deployment
The Docker Daemon will expose an IP address that we can direct our browser to to view the application.
$ echo "$(docker-machine ip swarm-0) prod.awesome-counter.com" | sudo tee -a /etc/hosts
$ open http://prod.awesome-counter.com
Your browser should look the same as it did when you tested the development deployment.
Scaling the Web Application Tier
The given services in the yaml file can be scaled using docker service scale command.
$ docker service scale example_web_app=5

example_web_app scaled to 5
overall progress: 5 out of 5 tasks
1/5: running   [==================================================>]
2/5: running   [==================================================>]
3/5: running   [==================================================>]
4/5: running   [==================================================>]
5/5: running   [==================================================>]
verify: Service converged
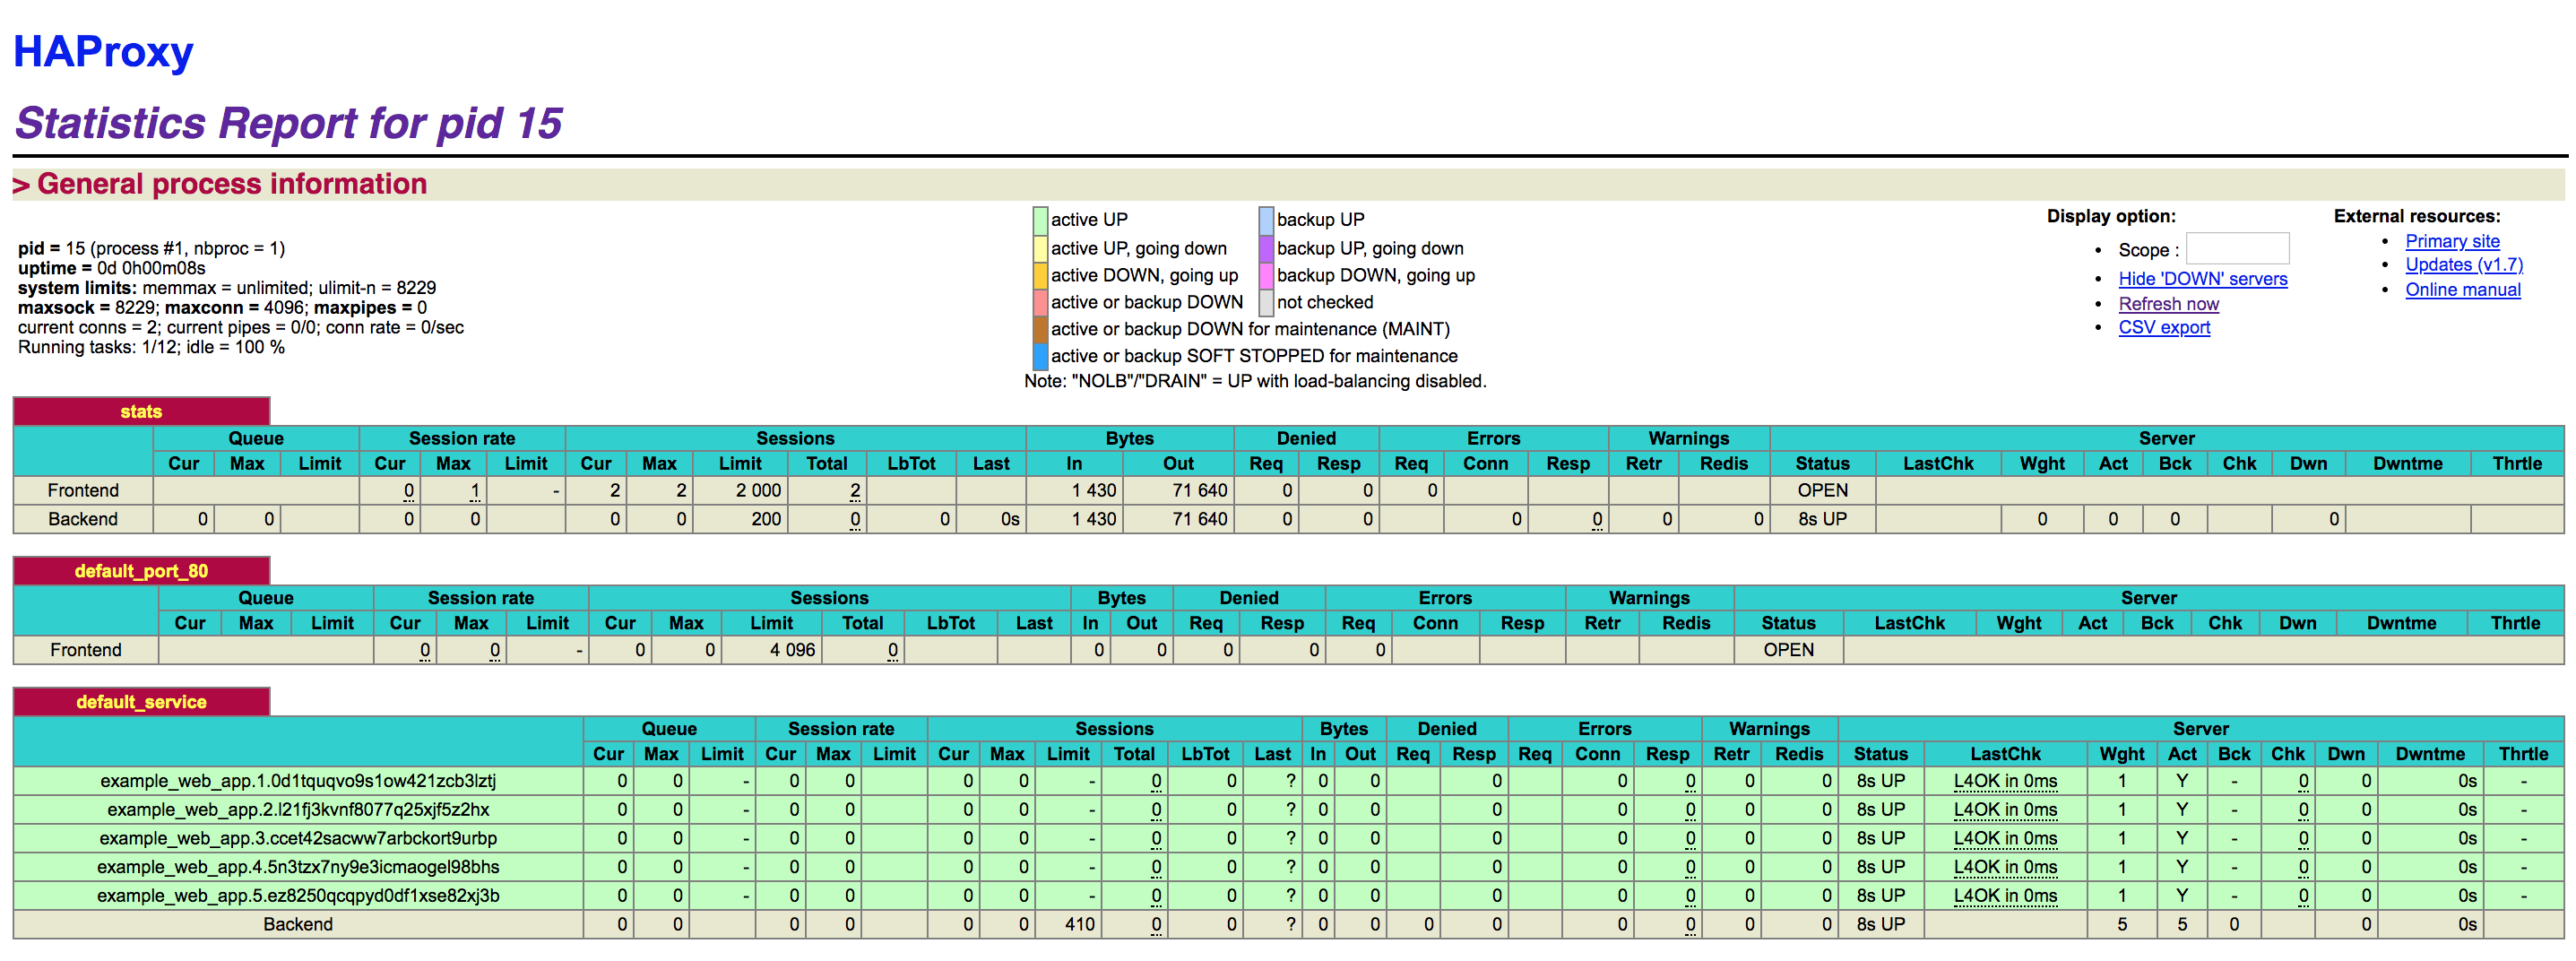
We can inspect HAProxy to see the new nodes behind the load balancer.
$ open http://prod.awesome-counter.com:1936
The default credentials are stats/stats when you are prompted! You should see a display something like,
Scaling the Aerospike Cluster
As the final step we can now scale the Aerospike cluster, again using docker service scale
$ docker service scale example_aerospike=5

example_aerospike scaled to 5
overall progress: 5 out of 5 tasks
1/5: running   [==================================================>]
2/5: running   [==================================================>]
3/5: running   [==================================================>]
4/5: running   [==================================================>]
5/5: running   [==================================================>]
verify: Service converged
Since Docker does not support multi-cast networks on Overlay networks, we need to assemble the cluster over the Mesh network via the tip command. We need to specify the --net parameter to Docker to ensure that we connect to the network that the Aerospike cluster is running on.
$ docker run --net example_prod aerospike/aerospike-tools asinfo -v "tip:host=$(docker $(docker-machine config swarm-0) inspect -f '{{.NetworkSettings.Networks.prod.IPAddress }}' example_aerospike.2.b85p7hirz7w25dds30r5df38w );port=3002" -h example_aerospike.1.j1g2anj9apad5zz0qycmuxcje
We can also automate cluster formation using a discovery script - aerospike/aerospike-docker-swarm
You can inspect the Aerospike Cluster config
$ docker run --net example_prod aerospike/aerospike-tools asadm -h example_aerospike.1.j1g2anj9apad5zz0qycmuxcje -e info

Seed:        [('example_aerospike.1.j1g2anj9apad5zz0qycmuxcje', 3000, None)]
Config_file: /root/.aerospike/astools.conf, /etc/aerospike/astools.conf
~~~~~~~~~~~~~~~~~~~~~~~~~~~~~~~~~~~~~~~~~~~~~~~~~~~~~~~~~~~~~~~~~~~~~~~~~~~~~~~~~~~Network Information (2019-09-25 06:33:12 UTC)~~~~~~~~~~~~~~~~~~~~~~~~~~~~~~~~~~~~~~~~~~~~~~~~~~~~~~~~~~~~~~~~~~~~~~~~~~~~~~~~~~~~
                                                                         Node               Node               Ip       Build   Cluster   Migrations       Cluster     Cluster         Principal   Client     Uptime
                                                                            .                 Id                .           .      Size            .           Key   Integrity                 .    Conns          .
example_aerospike.1.j1g2anj9apad5zz0qycmuxcje.example_prod:3000   BB90905000A4202    10.0.5.9:3000    C-4.6.0.4         5      0.000     EFDF94BC250   True        BB90D05000A4202        2   00:01:11
example_aerospike.2.b85p7hirz7w25dds30r5df38w.example_prod:3000   BB90705000A4202    10.0.5.7:3000    C-4.6.0.4         5      0.000     EFDF94BC250   True        BB90D05000A4202        2   00:01:10
example_aerospike.3.xw5yjm729wc3n606fvyo3hhgv.example_prod:3000   BB90805000A4202    10.0.5.8:3000    C-4.6.0.4         5      0.000     EFDF94BC250   True        BB90D05000A4202        2   00:01:10
example_aerospike.4.nmc4yoqhq8hr0c62rjn94op9z.example_prod:3000   BB90C05000A4202    10.0.5.12:3000   C-4.6.0.4         5      0.000     EFDF94BC250   True        BB90D05000A4202        2   00:01:02
example_aerospike.5.iaatyi0cd02b679yyqhiko57b.example_prod:3000   *BB90D05000A4202   10.0.5.13:3000   C-4.6.0.4         5      0.000     EFDF94BC250   True        BB90D05000A4202        2   00:01:03
Number of rows: 5

~~~~~~~~~~~~~~~~~~~~~~~~~~~~~~~~~~~~~~~~~~~~~~~~~~~~~~~~~~~~~~~~~~~~~~~~~~~~~~~~~~~~~~~~~~~~~~Namespace Usage Information (2019-09-25 06:33:12 UTC)~~~~~~~~~~~~~~~~~~~~~~~~~~~~~~~~~~~~~~~~~~~~~~~~~~~~~~~~~~~~~~~~~~~~~~~~~~~~~~~~~~~~~~~~~~~~~~~
Namespace                                                                            Node     Total   Expirations,Evictions     Stop       Disk    Disk     HWM   Avail%        Mem     Mem    HWM      Stop          PI         PI      PI     PI
        .                                                                               .   Records                       .   Writes       Used   Used%   Disk%        .       Used   Used%   Mem%   Writes%        Type       Used   Used%   HWM%
test        example_aerospike.1.j1g2anj9apad5zz0qycmuxcje.example_prod:3000   0.000     (0.000,  0.000)         false    0.000 B    0       50      99       0.000 B    0       60     90        undefined   0.000 B    0       N/E
test        example_aerospike.2.b85p7hirz7w25dds30r5df38w.example_prod:3000   0.000     (0.000,  0.000)         false    0.000 B    0       50      99       0.000 B    0       60     90        undefined   0.000 B    0       N/E
test        example_aerospike.3.xw5yjm729wc3n606fvyo3hhgv.example_prod:3000   0.000     (0.000,  0.000)         false    0.000 B    0       50      99       0.000 B    0       60     90        undefined   0.000 B    0       N/E
test        example_aerospike.4.nmc4yoqhq8hr0c62rjn94op9z.example_prod:3000   0.000     (0.000,  0.000)         false    0.000 B    0       50      99       0.000 B    0       60     90        undefined   0.000 B    0       N/E
test        example_aerospike.5.iaatyi0cd02b679yyqhiko57b.example_prod:3000   0.000     (0.000,  0.000)         false    0.000 B    0       50      99       0.000 B    0       60     90        undefined   0.000 B    0       N/E
test                                                                                        0.000     (0.000,  0.000)                  0.000 B                             0.000 B                                         0.000 B
Number of rows: 6

~~~~~~~~~~~~~~~~~~~~~~~~~~~~~~~~~~~~~~~~~~~~~~~~~~~~~~~~~~~~~~~~~~~~~~Namespace Object Information (2019-09-25 06:33:12 UTC)~~~~~~~~~~~~~~~~~~~~~~~~~~~~~~~~~~~~~~~~~~~~~~~~~~~~~~~~~~~~~~~~~~~~~
Namespace                                                                            Node     Total     Repl                      Objects                   Tombstones             Pending   Rack
        .                                                                               .   Records   Factor   (Master,Prole,Non-Replica)   (Master,Prole,Non-Replica)            Migrates     ID
        .                                                                               .         .        .                            .                            .             (tx,rx)      .
test        example_aerospike.1.j1g2anj9apad5zz0qycmuxcje.example_prod:3000   0.000     2        (0.000,  0.000,  0.000)      (0.000,  0.000,  0.000)      (0.000,  0.000)     0
test        example_aerospike.2.b85p7hirz7w25dds30r5df38w.example_prod:3000   0.000     2        (0.000,  0.000,  0.000)      (0.000,  0.000,  0.000)      (0.000,  0.000)     0
test        example_aerospike.3.xw5yjm729wc3n606fvyo3hhgv.example_prod:3000   0.000     2        (0.000,  0.000,  0.000)      (0.000,  0.000,  0.000)      (0.000,  0.000)     0
test        example_aerospike.4.nmc4yoqhq8hr0c62rjn94op9z.example_prod:3000   0.000     2        (0.000,  0.000,  0.000)      (0.000,  0.000,  0.000)      (0.000,  0.000)     0
test        example_aerospike.5.iaatyi0cd02b679yyqhiko57b.example_prod:3000   0.000     2        (0.000,  0.000,  0.000)      (0.000,  0.000,  0.000)      (0.000,  0.000)     0
test                                                                                        0.000              (0.000,  0.000,  0.000)      (0.000,  0.000,  0.000)      (0.000,  0.000)
Number of rows: 6
Finally, if you have refreshed the web page of the Application a few times, you will be able to see the Hits that were recorded in total, along with the hits per Application Server and the individual records
$ docker run -it --rm --net example_prod aerospike/aerospike-tools aql -h example_aerospike.2.b85p7hirz7w25dds30r5df38w
aql> select * from test.hits
+----------------------------------------+---------------+-------------+
| PK                                     | ts            | server      |
+----------------------------------------+---------------+-------------+
| "525df940-df5f-11e9-afbc-02420a00061c" | 1569393610829 | "10.0.5.28" |
| "56e1b9ac-df5f-11e9-b30d-02420a00061c" | 1569393618403 | "10.0.5.28" |
| "5301b670-df5f-11e9-8435-02420a00061c" | 1569393611902 | "10.0.5.19" |
| "57147e1e-df5f-11e9-8ed0-02420a00061c" | 1569393618736 | "10.0.5.21" |
| "56fc2e7c-df5f-11e9-a343-02420a00061c" | 1569393618577 | "10.0.5.28" |
...
aql> select * from test.summary
+---------------+-------+
| PK            | total |
+---------------+-------+
| "10.0.5.28"   | 6     |
| "10.0.5.19"   | 8     |
| "total_hits"  | 33    |
| "10.0.5.21"   | 9     |
| "10.0.5.27"   | 8     |
+---------------+-------+
Additional Information
Downloadable versions of the files used above can be found below.
- Development Scripts
- Production Scripts